Hacking together a Bluetooth Receiver
Rescuing Bluetooth headphones from the WEEE pile
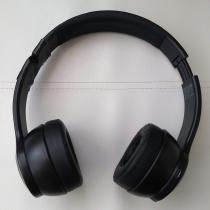
Broken Headphones
I had a pair of Bluetooth headphones that fell prey to the dreaded plastic fatigue, and one side had snapped. The attempted repair with Araldite and duct tape was not a success. I put them to one side, mourning the fact that they actually worked – apart from the part where they needed to sit comfortably on my head.
As it happens, I’d also been contemplating purchasing a Bluetooth audio receiver to use in the car. The car has a 3.5mm AUX input, so I could upgrade my podcast workflow so I was no longer juggling SD cards and MP3 players.
I then realised that the difference between the headphones and an audio receiver was the output was to a 3.5mm jack instead of a pair of speakers clamped to my ears. The headphones already had a 3.5mm jack – it was just that it was connected as an input and not an output. The plan was born.
Investigation
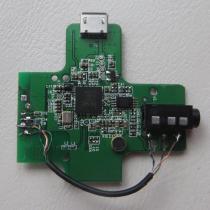
I figured that all of the internals would be found in the right ear cup, as that was where the control buttons, charging socket, and 3.5mm jack were. I attacked the headphones with a spudger and screwdriver and opened up the right side.
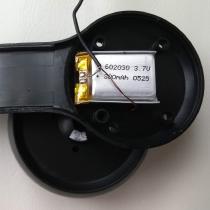
I found the expected circuit board, but no battery. I opened up the left side and found the battery. It makes sense to balance the weight.
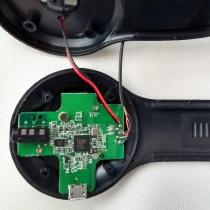
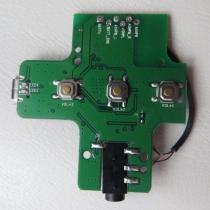
The connections for the battery and the left and right channels are marked clearly on the rear of the circuit board. Careful investigation of the circuit board revealed that the 3.5mm jack was connected by 3 tracks.
Rewiring
The first step was to convert the 3.5mm jack from an input to an output. The tracks were broken using a sharp blade, and then wired across to the output pads. Careful probing with a multimeter ensured the input connections were no more, and the output connections were good.
At this point, I used a USB power supply to verify things were functioning despite my poor soldering skills. I checked I could pair with it, and that there was audio output using a Pringles speaker. The next test was the car. This worked, and the output level was very good.
Reconstruction
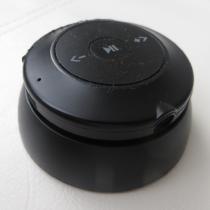
I decided to rebuild into the original ear cup. The arm part was hacked off to leave just the circular cup (and a hole). Some filing of key plastic parts and some double-sided carpet tape stopped the flexing that is key to headphones, but not desired in the new application.
The battery was fitted in the space previously occupied by the speaker. Before fitting the final cover, I used my multimeter to confirm that the battery was connected to the circuit, and that a charging voltage was present when the USB socket was connected.


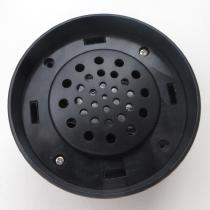
The hole in the side of the cup where the arm used to be was covered with some black duct tape. I’ll call it a homage to the failed repair, rather than an ugly bodge.
Bluetooth Audio Receiver
Apart from the tape, I’m pleased with the result. I have bought a broken piece of electronics back into operation.
In the car it sits in a position where the buttons are easy to reach, and should have good battery life. If I fail to charge it, I can just charge in the car.
The only disappointment is that it is just a little too large to drop into a cup holder.